Simpvp Event Creation Guide: Difference between revisions
(Create page) |
(Add images) |
||
| Line 8: | Line 8: | ||
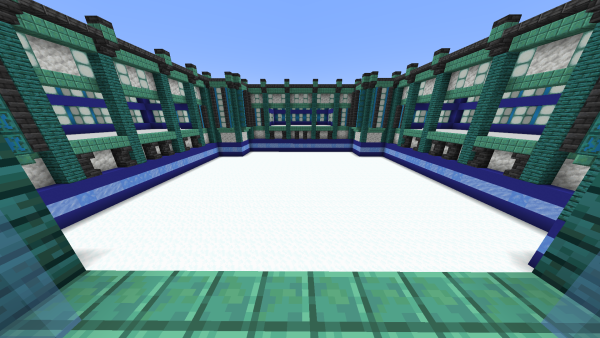
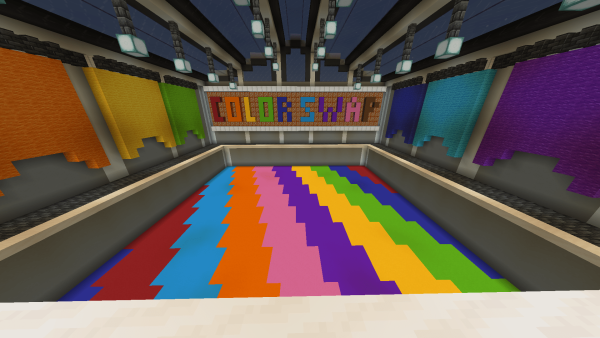
When making the arena, there are a few things to consider. Most importantly, make sure players are unable to escape it. Barrier blocks can help with this. In addition to that, for the best chance of your event getting accepted, make sure the arena looks good. If you have large walls to keep players trapped in the event, try decorating them a bit. You could add text to the walls that show what the event is, you could add a Simpvp logo, and add variation to the wall's structure. For example, include glass lines in the wall with lighting behind it. Here are some examples of modern event arenas: | When making the arena, there are a few things to consider. Most importantly, make sure players are unable to escape it. Barrier blocks can help with this. In addition to that, for the best chance of your event getting accepted, make sure the arena looks good. If you have large walls to keep players trapped in the event, try decorating them a bit. You could add text to the walls that show what the event is, you could add a Simpvp logo, and add variation to the wall's structure. For example, include glass lines in the wall with lighting behind it. Here are some examples of modern event arenas: | ||
'''Example Event Arenas:''' | |||
{| style="width:100%;" | |||
| style="padding: 0;" | [[File:MoSpleefArena.png|thumb|600px|An event arena for hosting spleef]] | |||
| style="padding: 0;" | [[File:ColorSwapEvent.png|thumb|600px|An event arena for hosting color swap]] | |||
|} | |||
Notice how there are dedicated spaces for spectators to view the event. Spectator areas are important. They can act as a lobby where players can wait for the next event to start. It also allows players to view the rest of the event if they die. | Notice how there are dedicated spaces for spectators to view the event. Spectator areas are important. They can act as a lobby where players can wait for the next event to start. It also allows players to view the rest of the event if they die. | ||
| Line 23: | Line 27: | ||
'''Button 3:''' Ends the event. Anything that needs to happen to reset the event should be here. The arena should be reset, and players should be sent back home using the /endevent command. | '''Button 3:''' Ends the event. Anything that needs to happen to reset the event should be here. The arena should be reset, and players should be sent back home using the /endevent command. | ||
'''Example command block modules:''' | |||
{| style="width:100%;" | |||
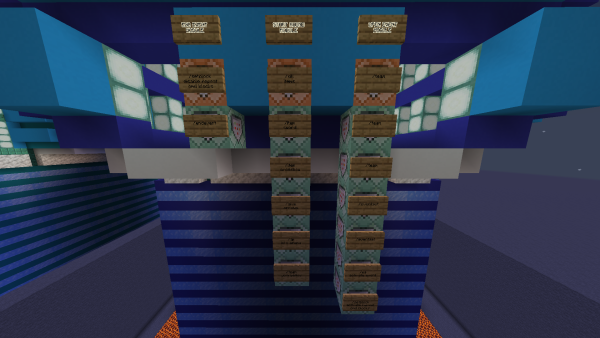
| style="padding: 0;" | [[File:2023-06-17_12.29.02.png|thumb|600px|The command blocks for each of the three buttons]] | |||
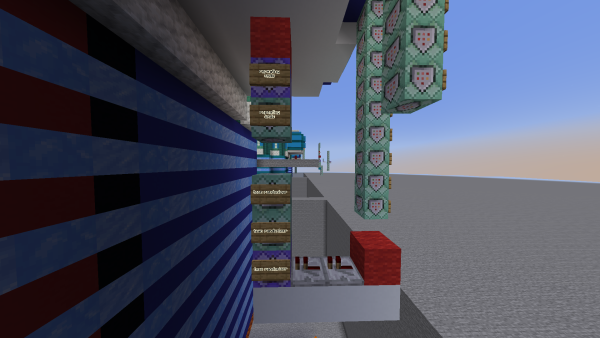
| style="padding: 0;" | [[File:CommandBlockModules.png|thumb|600px|Repeating command blocks and a team randomizer module]] | |||
|} | |||
=== Event Plugin Commands Overview === | === Event Plugin Commands Overview === | ||
Revision as of 17:11, 17 June 2023
Welcome to the Simpvp Event Creation Guide. In this guide, you will learn how to make your own event for Simpvp.
Step 1: Build the Event Arena
Now it is time to make the actual event arena.
Arena: When making the arena, there are a few things to consider. Most importantly, make sure players are unable to escape it. Barrier blocks can help with this. In addition to that, for the best chance of your event getting accepted, make sure the arena looks good. If you have large walls to keep players trapped in the event, try decorating them a bit. You could add text to the walls that show what the event is, you could add a Simpvp logo, and add variation to the wall's structure. For example, include glass lines in the wall with lighting behind it. Here are some examples of modern event arenas:
Example Event Arenas:
Notice how there are dedicated spaces for spectators to view the event. Spectator areas are important. They can act as a lobby where players can wait for the next event to start. It also allows players to view the rest of the event if they die.
Step 2: The Control Center
The control center is where most of the commands for the event will be run. There is no perfect control center, you can customize yours in any way you want. It is recommended to follow the structure down below, however.
Most control centers have 3 main buttons.
Button 1: Makes the event active. This means players are alerted that an event is starting and tells them to do /event to join. This button also will create any teams that are needed. This is done by using the /team command. Finally, you can activate any repeating command blocks in your event that need to be activated.
Button 2: Begins the event. Anything you want to be active at the start of the event is put here. Command blocks that give the players their gear should be put here, and this is where you should teleport the players out of the lobby and into the arena. This button could also reset the event if you wanted. This would make it possible to play the event multiple times without needing to end the event and start it again.
Button 3: Ends the event. Anything that needs to happen to reset the event should be here. The arena should be reset, and players should be sent back home using the /endevent command.
Example command block modules:
Event Plugin Commands Overview
Here are the commands you will need to use to make an event function
/eventset
This command sets the spawn location of an event. It can also be used to set a respawn point for a specified team. This is also where you specify if you want players to keep their inventory on death or not.
Set default spawn:
/eventset x=<x coord> y=<y coord> z=<z coord>
Set team spawn:
/eventset x=<x coord> y=<y coord> z=<z coord> team=<team>
Set team spawn and set keep inventory to true:
/eventset x=<x coord> y=<y coord> z=<z coord> team=<team> keepinventory=true
/ea
This command marks an event as active, or inactive. Active events are able to be joined with /event and inactive events can't. Open event:
/ea true <event name>
Close event:
/ea false
/endevent
This command sends all the players out of the event and back to their previous locations
/endevent
Event Templates
Below are some examples of specific event templates. These templates are slightly more advanced. They include a spectator arena, respawning, and more. If you are unable to understand how to create these templates, make sure to visit the build server to see them for yourself. The location of each template is in the below sections.
The given commands will be split into sections. Make sure each section of commands is in a single line of command blocks. The first command needs to be an impulse command block, and all the following ones need to be always active chain command blocks.
<command blocks img> <repeat command blocks img>
Solo Event Template
Most basic event. All players are on the same team. Players can either be fighting each other or can be working together towards a common goal. Run "/tpc 57 81 1012 simpvp-events" on the build server for an example of a solo event control center
Open event commands
/team add yellow
/team modify yellow color yellow
/team modify yellow friendlyFire true
/eventset x=<x coord> y=<y coord> z = <z coord>
NOTE: replace x y and z coordinates with where you want the players to spawn in the event
/eventset x=<x coord> y=<y coord> z = <z coord> team=yellow
NOTE: replace x y and z coordinates with where you want the players on yellow team to spawn in the event
/ea true <event name>
/setblock <coords of repeating command blocks> redstone_block
NOTE: you might not know the coordinates of your repeating command blocks yet. This command needs to place a redstone block next to any repeating command blocks you have to enable them. We will create a repeating command block in this example soon. Come back to this command later to fill in the coordinates
Start round commands
/kill @e[type=item,distance=..200]
/item replace entity @a[distance=..200,gamemode=adventure] hotbar.0 with minecraft:diamond_sword{Unbreakable:1b}
/item replace entity @a[distance=..200,gamemode=adventure] hotbar.1 with crossbow{Unbreakable:1b,Enchantments:[{id:"minecraft:multishot",lvl:1s},{id:"minecraft:quick_charge",lvl:3s}]} 1
/give @a[distance=..200,gamemode=adventure] arrow 320
/tp @a[distance=..300,gamemode=adventure] <coords of the arena>
NOTE: replace <coords of the arena> with where you want to tp the players to
/team join yellow @a[distance=..300,gamemode=adventure]
End event commands
/setblock <coords of repeating command blocks> red_wool
NOTE: you might not know the coordinates of your repeating command blocks yet. This command needs to place a red wool block next to any repeating command blocks you have to disable them. We will create a repeating command block in this example soon. Come back to this command later to fill in the coordinates
/endevent
Repeating command blocks
/gamemode adventure @a[distance=..300,gamemode=survival]
/execute positioned <event spawn location> run team leave @a[distance=..5,team=!]
NOTE: replace <event spawn location> with where the players first spawn in the event
Endless Solo Event Template
The endless solo event is the same as a normal solo event, except this event typically is hosted for much longer and players are able to join the event at any time, even after it has started. Run "/tpc 57 81 1076 simpvp-events" on the build server for an example of an endless solo event control center
Open event commands
/team add yellow
/team modify yellow color yellow
/team modify yellow friendlyFire true
/eventset x=<x coord> y=<y coord> z = <z coord> keepinventory=true
NOTE: replace x y and z coordinates with where you want the players to spawn in the event
/eventset x=<x coord> y=<y coord> z = <z coord> team=yellow keepinventory=true
NOTE: replace x y and z coordinates with where you want the players on yellow team to spawn in the event
/ea true <event name>
Start round commands
/setblock <coords of repeating command blocks> redstone_block
NOTE: you might not know the coordinates of your repeating command blocks yet. This command needs to place a redstone block next to any repeating command blocks you have to enable them. We will create a repeating command block in this example soon. Come back to this command later to fill in the coordinates
End event commands
/setblock <coords of repeating command blocks> red_wool
NOTE: you might not know the coordinates of your repeating command blocks yet. This command needs to place a red wool block next to any repeating command blocks you have to disable them. We will create a repeating command block in this example soon. Come back to this command later to fill in the coordinates
/endevent
Repeating command blocks
/gamemode adventure @a[distance=..300,gamemode=survival]
NOTE: make sure this is a repeating command block
/execute positioned <corner 1> as @a[distance=..30,dx=<corner 2 x>,dy=<corner 2 y>,dz=<corner 2 z>,gamemode=adventure,team=!yellow] run clear @s[distance=..30]
NOTE: this command sets up a box by using two corners, just like using the world edit wand. This makes it so that the command is only executed on the player in this bounding box, and not players currently inside the event arena. Note that corner 2 needs to be set using dx, dy, and dz in the player selector. These are relative coordinates.
/execute positioned <corner 1> as @a[distance=..30,dx=<corner 2 x>,dy=<corner 2 y>,dz=<corner 2 z>,gamemode=!creative,gamemode=!spectator,team=!yellow] run item replace entity @s[distance=..30] hotbar.0 with minecraft:diamond_sword{Unbreakable:1b}
/execute positioned <corner 1> as @a[distance=..30,dx=<corner 2 x>,dy=<corner 2 y>,gamemode=adventure,team=!yellow] run item replace entity @s[distance=..30] hotbar.1 with
crossbow{Unbreakable:1b,Enchantments:[{id:"minecraft:multishot",lvl:1s},{id:"minecraft:quick_charge",lvl:3s}]} 1
/execute positioned <corner 1> as @a[distance=..30,dx=<corner 2 x>,dy=<corner 2 y>,dz=<corner 2 z>,gamemode=adventure,team=!yellow] run give @s[distance=..30] arrow 320
/execute positioned <corner 1> as @a[distance=..30,dx=<corner 2 x>,dy=<corner 2 y>,dz=<corner 2 z>,gamemode=adventure,team=!yellow] run team join yellow @s[distance=..30]
/execute positioned <corner 1> as @a[distance=..30,dx=<corner 2 x>,dy=<corner 2 y>,dz=<corner 2 z>,gamemode=adventure] run tp @s[distance=..30] <coords of the arena>
Team Event Template
In a team event, there are at least two teams who face off against each other. Run "/tpc 57 81 1140 simpvp-events" on the build server for an example of a team event control center
Open event commands:
/team add red
/team modify red color red
/team modify red friendlyFire true
/team add blue
/team modify blue color blue
/team modify blue friendlyFire true
/eventset x=<x coord> y=<y coord> z = <z coord>
NOTE: replace x y and z coordinates with where you want the players to first spawn
/eventset x=<x coord> y=<y coord> z = <z coord> team=red
NOTE: replace x y and z coordinates with where you want the players on red team to spawn in the event
/eventset x=<x coord> y=<y coord> z = <z coord> team=blue
NOTE: replace x y and z coordinates with where you want the players on blue team to spawn in the event
/setblock <coords of repeating command blocks> redstone_block
NOTE: you might not know the coordinates of your repeating command blocks yet. This command needs to place a redstone block next to any repeating command blocks you have to enable them. We will create a repeating command block in this example soon. Come back to this command later to fill in the coordinates
Start round commands
/kill @e[type=item,distance=..200]
/item replace entity @a[distance=..200,gamemode=adventure] hotbar.0 with minecraft:diamond_sword{Unbreakable:1b}
/item replace entity @a[distance=..200,gamemode=adventure] hotbar.1 with crossbow{Unbreakable:1b,Enchantments:[{id:"minecraft:multishot",lvl:1s},{id:"minecraft:quick_charge",lvl:3s}]} 1
/give @a[distance=..200,gamemode=adventure] arrow 320
/tp @a[distance=..300,gamemode=adventure] <coords of the arena>
NOTE: replace <coords of the arena> with where you want to tp the players to
/setblock <coords of auto team randomizer> redstone_block
NOTE: you might not know the coordinates of your team randomizer yet. This command needs to place a redstone block next to the team randomizer input. We will create this later in this example. Come back to this command later to fill in the coordinates
End event commands
/setblock <coords of repeating command blocks> red_wool
NOTE: you might not know the coordinates of your repeating command blocks yet. This command needs to place a red wool block next to any repeating command blocks you have to disable them. We will create a repeating command block in this example soon. Come back to this command later to fill in the coordinates
/endevent
Repeating command blocks
/gamemode adventure @a[distance=..300,gamemode=survival]
/execute positioned <event spawn location> run team leave @a[distance=..5,team=!]
NOTE: replace <event spawn location> with where the players first spawn in the event
Team randomizer module
/team join red @r[gamemode=adventure,distance=..200,team=]
NOTE: this command needs to be in a repeating command block. This command block will be triggered from the setblock command from the start round section. Make sure the input redstone block leads into some sort of delay which then leads into the repeating command block
/team join blue @r[gamemode=adventure,distance=..200,team=]
/setblock <coords of input redstone block> red_wool
Step 3: Migrating the Event to Simpvp
At this point, you should have a completed arena and a control room for your event. This means your event should be functional. Before the event is ready to move to Simpvp, however, there are some best practices you need to make sure you are following.
Distance Restrictions
In command blocks, there is a way to select players or entities. It is usually formatted something like this:
Bad player selector: @a[team=yellow]
Make sure to include a distance restriction in any of these player or entity selectors. This makes it so that people who are playing Simpvp normally are not selected.
Good player selector: @a[team=yellow,distance=..100]
This will make sure the event is only able to affect players inside the event
Tag Command
Avoid using the /tag command on players. Tags stick on players even after they leave the event, which could potentially make a command activate on them when they are in the normal Simpvp world
Repeating Command Blocks
Make sure all repeating command blocks are set to "requires redstone". Only activate these repeating command blocks when the event starts. When the event ends, make sure to disable them. This makes it so 1000s of commands aren't being run on the server when the event is inactive
Use Relative Coordinates
Make sure that whenever you use coordinates in your event, only use relative coordinates. Relative coordinates are a way to calculate an x y z position relative to where the command is being executed. The syntax is ~x ~y ~z. Use the /relativecoords command with a worldedit want to calculate the relative coordinates automatically
Have an Idea of What WorldGuard flags to Use
The admin that migrates the event will need to know what worldguard flags you want. Worldguard flags are a way to control what players can do. Here are some examples that we are able to toggle:
Allows players to pvp?
Allow players to break blocks?
Should players need to eat?
Should players be allowed to drop items?
Should mobs be allowed to spawn?
Make a list of what flags you want, and the admin can make it on the Simpvp server
Admin Approval
Once you have followed the above steps, you can reach out to an admin to move the event over to Simpvp. There are no guarantees the admin will accept the event and move it to Simpvp, but if you follow this guide your chances will be much more likely. The admin will look over your event and possibly ask for you to adjust some of it.
Congratulations, and thank you for making a new event!


